

Start with WooCommerce Analytics if you need to check monthly sales and refunds. It’s included, it compares periods, it counts a refund in the period when the refund was issued, and it downloads report tables as CSV. For advanced WooCommerce reporting, pay only for the output Analytics can’t give you. Try Ninjalytics Free for a line-item CSV. Look at paid options when you need saved costs in a profit report or a file sent every week. For a weekly item file inside WordPress, compare BerryPress’s Scheduled Email Reports add-on (documented with Ninjalytics Pro) with Metorik’s recurring Orders and Refunds exports. If store policy rules out syncing customer data to a hosted service, leave Metorik off the list.
Disclosure: WPBay publishes this article and sells one of the tools compared here. This is a documented shortlist, not a lab test. We haven’t run the paid tools against the staging fixture later in the article, so each capability below is what the vendor documents. Prices and listed features were checked on November 19, 2026, when WooCommerce 11.3.1 and WordPress 7.1.5 were current. The example numbers are calculated from the sample order, and the fixture is there so you can produce observed results on your own stack before paying.
Advanced WooCommerce reporting tools compared
The table lists documented capabilities and regular single-site prices in US dollars as of November 19, 2026. BerryPress and IThemeland were both running promotions that day, so the price in your cart may be lower. Each tool name links to its section below, where the caveats live.
| Tool | Job it fits | Documented output | Regular price | Check before buying |
|---|---|---|---|---|
| WooCommerce Analytics | Monthly sales and refund checks | Revenue CSV (one row per day), Orders CSV with separate refund rows, Products CSV | Included | No margin, no item rows, no recurring report email |
| Advanced Woocommerce Sales Reporting | Product and order reports with cost and profit fields | Listing documents product and order CSV email settings. Payload and row layout not documented | Checkout price and term unconfirmed (see listing note) | Declared testing stops at WooCommerce 8.x and WordPress 6.8.x. HPOS not stated |
| REPORTiT | Filtering and reports in wp-admin | CSV or Excel, depending on the report. Scheduled emails for supported reports | $99 for one year (Woo Marketplace) | Profit add-on sold separately. Activation on the Marketplace build unconfirmed |
| Ninjalytics | One CSV row per order item | Free: CSV with a line-item mode. Pro: XLSX, detailed tax and refund fields | Free. Pro $69, scheduler add-on $30 (one year of updates and support each) | Scheduling documented with Pro. Profit needs a COGS plugin |
| Metorik | Cohorts, segments, several stores | Digests, plus recurring Orders and Refunds CSVs by email, Slack or webhook | From $25 a month (Starter) | Store data is synced to a hosted service |
| Daily PDF Sales Report Email | Week-to-date totals by email | Daily PDF, optional monthly PDF on the 1st | $69 for one year (Woo Marketplace) | No row-level export |
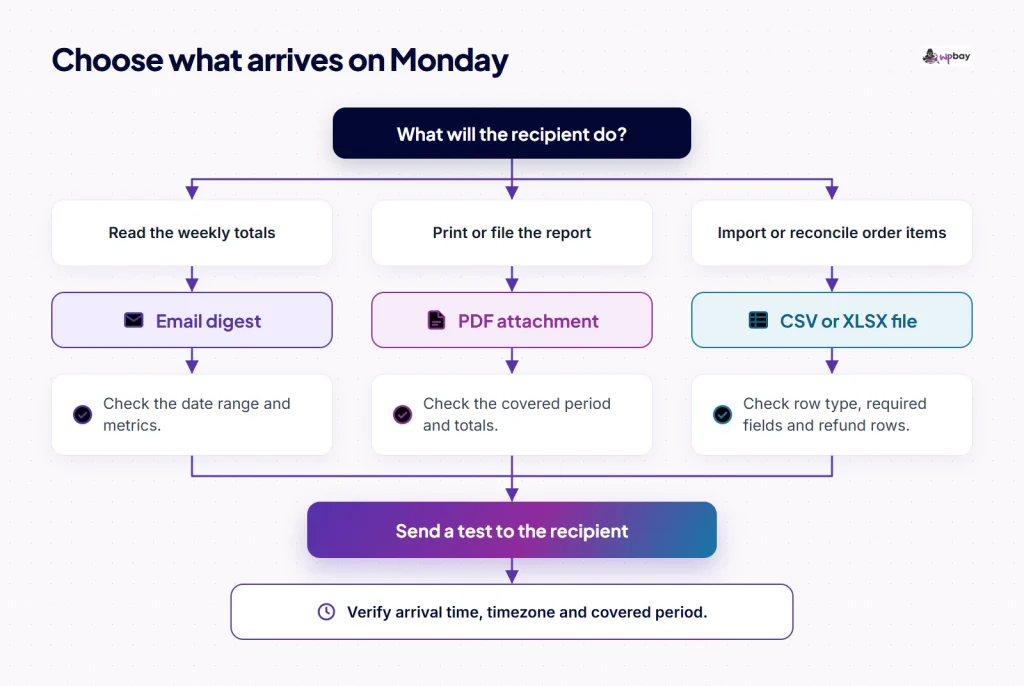
Ask finance which columns their import requires. If a manager just reads weekly totals, check the PDF or digest instead. The difference is in what arrives: an attached CSV can go straight into an import, a download link needs someone with access to open it before it expires, and an inline digest gives totals with no rows at all. The flow below is an illustration of that choice, not a capture from any of the tools.
Two kinds of tool sit outside the table but may suit a narrower job. If all you want is margin inside reports, look at Cost of Goods by SkyVerge, which describes profit reports by date, product and category. Woo warned in its 2025 COGS roadmap post that running it alongside core COGS gives you two cost totals, so check which source its reports read. If you need a scheduled order file and no reporting at all, Customer / Order / Coupon Export documents automated CSV or XML exports by email, FTP or HTTP POST, scheduled in the site timezone. It marks orders as exported so later runs of the same automated export skip them, which matters if finance expects each order exactly once. Run either one against the same fixture and check how it handles refund rows before buying.
Which reporting tool fits your workflow?
Qamar Sammi’s plugin on WPBay: confirm your stack first
According to its WPBay listing, Advanced Woocommerce Sales Reporting by Qamar Sammi adds a wp-admin dashboard with product and order reports, cost and profit fields, and filters for customer role, payment method, shipping method and order status. The listing places email settings under WooCommerce > Sales Report Pro > Email Settings, with separate switches and recipient lists for a product CSV and an order CSV, plus a frequency setting in hours, days or weeks under automatic stats. It doesn’t say whether that frequency drives both CSVs, whether files are attached or linked, how many rows each order gets, or whether a weekly send follows calendar weeks. It’s also silent on how refunds are allocated and whether profit uses the cost saved on the order.
The WPBay listing reports version 1.0.0 with testing through WooCommerce 8 and WordPress 6.8, and it doesn’t mention HPOS. Ask the seller about your versions and order storage before buying, and ask for a sample of each CSV. Then run the staging fixture on your actual stack and look at what arrives in the inbox. Support is handled by Qamar Sammi through WPBay tickets opened from My Downloads in your account.
Listing note: the indexed product page displayed US$40 for one site before tax, with Yearly and Lifetime selectors, and we couldn’t tie that amount to a selected term or confirm a renewal amount. Before buying, check both selector states and the cart without completing the order, and note the first charge, any renewal and the site limit. WPBay runs checkout and handles payment and applicable transaction taxes as Merchant of Record for standard marketplace purchases. Sellers choose each product’s license options (WPBay license information), so activation and site limits come from this listing rather than a marketplace-wide rule.
REPORTiT for filtering inside wp-admin
REPORTiT costs US$99 for one year on the Woo Marketplace (US view) and declares support for both HPOS and legacy storage. If you’re migrating to HPOS, compare the same order totals before and after switching storage on staging. Its documentation on exports and scheduled emails treats manual exports (CSV or Excel, depending on the report) and recurring emails for supported reports as separate features. It doesn’t establish that a scheduled email can carry an Orders file, what grain those rows would have, or whether delivery is an attachment, a link or an inline summary.
Profit needs a separate COGS add-on, which IThemeland advertised at US$39 one time under a promotion. It requires premium REPORTiT and takes manual costs or costs from supported COGS plugins (its FAQ names SkyVerge and WPFactory products). The add-on is sold directly, and we found nothing confirming it activates on the Marketplace build, so treat that US$39 as conditional. Buy REPORTiT if you want broad filtering and manual exports in wp-admin. Hold off if you need profit or a scheduled Orders file, until IThemeland confirms the add-on SKU for your build and you’ve seen a scheduled email arrive with the file you need.
Ninjalytics for one CSV row per order item
Start with Ninjalytics Free’s line-item export mode and check it against your recipient’s column list. The WordPress.org listing documents CSV exports, the line-item mode, basic tax fields and HPOS support. XLSX, detailed tax and refund fields, custom metadata and paid, completed or custom date filters are Pro features. Profit needs a compatible COGS plugin, and the documentation doesn’t say whether each report reads the cost saved on the order or the current cost, so run the $20-to-$25 control described later.
For scheduling, the documented path is Pro plus the separately activated Scheduled Email Reports add-on, US$99 together at regular prices. BerryPress’s add-on setup guide still lists Free from 1.4.1, but the current Ninjalytics integration guide requires activated Pro. Only count on the US$30-only route if BerryPress confirms it for current builds or your staging test proves it. After activating both plugins, save the preset you want to email:
- In Ninjalytics, save a CSV preset with the line-item columns, and check which order date it filters on.
- Go to WooCommerce > Scheduled Email Reports and add recipients.
- Write a subject with the
[start]and[end]placeholders, so recipients can see the window. - Set Schedule (for example, Wednesdays at 08:00) and Data interval (how far back the report reaches, such as 7 days).
- Pick the preset under Include reports, click Save & Send Now and compare the subject dates with the rows in the file.
CSV presets arrive as attachments. HTML presets go into the email body when it contains the [reports] shortcode. The add-on runs on WP-Cron, and BerryPress warns that low-traffic sites can see delays. Save & Send Now proves the output and the mail path. Only a queued run proves the schedule and the window it actually picks.
Metorik for cohorts, segments and several stores
Use Metorik if you need to report by customer cohort or compare segments across connected stores. It runs off-site, and the Helper plugin syncs orders, customers and products to Metorik’s servers, so read its privacy policy and get each client’s agreement before connecting their store.
Name the view when you compare it with Analytics. Refunds land on the refund date in the Revenue report and on the original order date in the Orders report, and the Refunds report can switch between the two. The Orders report and the Orders resource you export from are different things, so don’t assume they share a date basis.
For costs, Metorik imports native WooCommerce product costs (9.8 and later) or costs from a supported COGS extension, and it can also deduct transaction fees and other configured costs. Turn those extras off, or isolate merchandise revenue and product cost, before comparing with the fixture’s gross profit. A routine product edit keeps costs already recorded on old orders. Cost Tools has two modes: override replaces existing recorded costs, while missing-only fills blanks on past orders and can still change historical profit totals because those orders previously had no cost.
For the file, open the Orders resource, filter by date created (for example, last week), choose one row per line item, set the columns and add a schedule by email, Slack or webhook (Metorik’s export guide). Repeat on Refunds with a refund-date filter; Metorik’s automatic backups guide lists Refunds as a schedulable source. If the recipient imports the file, enable the attachment option: Metorik attempts to attach files under 8 MB and sends a link otherwise. With the option off, you always get a link.
A digest is separate from those files. A weekly digest sent on Monday covers the previous Monday through Sunday in the store timezone and excludes the current day. On billing, Starter is US$25 a month for one store and up to 100 orders a month, and Level 2 is US$75 for up to 500 orders and five stores. Plan assignment follows your previous three months’ order volume and store count, so a busy December can move you up a tier on the next billing cycle.
Metorik’s October 2023 walkthrough shows how to move from product sales into variations, category comparisons and segmented reports. Use it for the interface, and the billing page above for current plans.
Daily PDF Sales Report Email for week-to-date totals
At US$69 for one year, this extension emails a daily PDF covering the week so far through yesterday, plus an optional previous-month PDF on the 1st. A full past-week PDF is a manual download, and the vendor guide notes that a test sent on the first day of a new week covers the week just ended. It follows Analytics’ revenue definitions and Date Type, but it keeps its own settings: Order Statuses is under WooCommerce > Daily Report Email > Report, and Week Starts On is under the Schedule tab. If the totals don’t match Analytics, align Date Type, those statuses, the week start and the covered dates, then check Analytics data freshness on the Analytics side. It sends a PDF, so keep it out of any plan that needs order rows.
What WooCommerce Analytics already gives you
Before installing a plugin, export October and November from Analytics and write down the date field and excluded statuses it used. A paid tool needs the same settings, or its totals won’t line up with the baseline.
- Settings > General (the WordPress screen): record the production Timezone and Week Starts On, and set staging to match. Analytics’ weekly presets use that week start, though other tools have their own controls.
- WooCommerce > Settings > Advanced > Features: enable Cost of Goods Sold if you want costs saved on orders, and note whether order storage is HPOS or legacy and whether compatibility sync is on.
- Analytics > Settings: review Excluded statuses (Pending payment is excluded by default, and Refunded can’t be excluded) and Date Type (Date Paid by default, with created and completed available for Revenue and Orders). On WooCommerce 10.5 and later, the same screen has the update setting: Scheduled imports every 12 hours, Immediately imports as data arrives.
- Check the data status indicator. If it’s behind, click Update Now, wait for the import, then recheck the order you care about.
- Analytics > Revenue: pick the range and a previous-period or previous-year comparison, then use the download button above the table.
According to Woo’s CSV documentation, a report that fits on one page downloads immediately. A paginated report is generated in the background for the whole filtered result and emailed as a link to the requesting user’s account address, and the link lasts a week. Rows depend on the report. The Revenue table in 11.3.1 requests daily intervals, so expect one row per day even when the chart is grouped by week, and check a downloaded file on your own build. The Orders report lists orders, with refunds on their own rows dated to the refund. Products groups by product. Use an item exporter if the recipient needs a row for each line, because two lines can share a SKU and only the original line ID tells them apart.
Returns, net sales and total sales
Woo’s general definitions give gross sales as merchandise price times quantity, net sales as gross minus returns and coupons, and total sales as net plus tax and shipping. They also say a refund is booked when it’s issued, with refunded tax and shipping in the Taxes and Shipping metrics. That’s accurate for net sales on a merchandise-only refund, but the Returns column needs care.
Woo’s two guides disagree about whether the Revenue report counts refunded tax in Returns. The Revenue report guide says refunded tax on a fully refunded order appears in Returns. The code agrees for the current path: in 11.3.1 the Revenue endpoint reads the order stats lookup data, and its Returns calculation sums net, tax and shipping on refund rows, while Taxes and Shipping aggregate the same refunded amounts in their own columns. Older stores with data built under the legacy calculation can show something different. So on 11.3.1, a refund that includes tax or shipping can make Returns larger than the drop in net sales. On staging, make a partial refund with separately refunded tax or shipping and a taxed full refund, then record Returns, Net sales, Taxes, Shipping and Total sales for each.
When historical data looks wrong, work through the cheap checks before a reimport. Confirm the Date Type, the data status and freshness, then run Clear Analytics Cache under WooCommerce > Status > Tools. If orders failed to import, a warning appears under Analytics > Settings > Import historical data with a View the log link and a Retry failed imports button; fix the logged cause before retrying. WooCommerce > Status > Tools also has two targeted repairs: Fix Analytics Full Refund Data for full refunds stored the older way, and Fix double-counted refunds in Analytics for affected partial-then-full refunds recorded before 11.1 on eligible stores. Deleting previously imported data and reimporting is the broad option. It leaves orders, products and customers alone, but reports stay incomplete until the rebuild finishes.
If an order seems to be in the wrong month, open it and compare its created, paid and completed dates with the report’s Date Type, and its status with Excluded statuses. An order paid October 31 and completed November 1 changes months when Date Type changes, and an order with no qualifying date can disappear from the report entirely.
Why a processor payout won’t match
A payout groups charges and refunds from different days and nets out fees, disputes and adjustments on the processor’s own payout schedule. Start from one payout’s transaction list, not a sales report. As a hypothetical, a November 4 payout might contain the sample order’s $129 charge from October 30, a $4.04 processing fee and the $55 refund from November 2, assuming the processor keeps the original fee. The deposit is $69.96. WooCommerce shows $129 total sales in October and −$55 in November, so match the charge and the refund to the order by order or transaction ID and list the fee separately. For a whole month, include the processor’s opening and closing balances so funds still pending at month-end don’t look like an error.
Where core WooCommerce shows item costs
With core COGS enabled, you set a cost per product, variations can override it, and the order editor shows each line’s cost, including refunded item costs. Editing the catalog cost later doesn’t rewrite the cost already saved on an existing order. Woo says this feature doesn’t feed Analytics, so you see the cost on a single order but get no margin column for the month. That gap is what a profit tool has to fill, and the first thing to ask is which cost source it reads.
A staging test you can run before buying
The figures below apply Woo’s definitions to one order. Reversing COGS on a returned unit is our assumption, not documented behavior for any tool. Run the fixture in core first, then in each candidate, and record the build, plan, order storage, cost source, date basis, both monthly totals, the CSV headers and a sample row, and the observed send time, window and payload.
Set up the fixture
Use an isolated single-currency USD staging store with prices entered exclusive of tax, a 10% standard tax rate, and an $8 flat-rate shipping method with Tax status set to None. Turn on stock management for the variation so the restock control appears, and route all staging mail to a mail catcher so nothing reaches real recipients. Don’t use a gateway in test mode: WooCommerce 11.3.1 leaves recognized test orders, such as WooPayments test-mode orders, out of Analytics even though they appear in the order list.
Instead, enable an offline method such as Check payments under WooCommerce > Settings > Payments. Place the order at checkout as a customer with a taxable address: two units of one variation at $60 each and a $10 Fixed cart coupon, which splits $5 per unit and leaves $110 taxable merchandise, $11 tax and $8 shipping for a $129 total. Set the unit cost to $20. Then change the order status to Processing, which sets the paid date, and confirm three things before going on: the order header shows a paid date, the status isn’t excluded, and the order appears in Analytics > Orders after a data update.
To enter the refund, open the order, click Refund and set the line quantity to 1. WooCommerce prefills the line amounts, including proportional tax ($5.50 here), so clear every prefilled tax field to 0 and leave shipping unrefunded. Tick Restock refunded items and check that the button reads Refund $55.00 manually before clicking. A manual refund records the refund without sending money through a gateway. It’s $55, not $60, because the coupon is split across both units.
The admin records the refund when you click, and the refunds API exposes its creation date as read-only, so you can’t backdate it. You don’t need to wait for a month-end, though. Pay on one day, refund the next, and set every custom range so the boundary falls between the two days; the dates in this article then map onto yours. To test both storage modes, clone the staging site after the order exists, switch storage under WooCommerce > Settings > Advanced > Features on the clone, and confirm which store is authoritative before rerunning the reports. A real month boundary remains the fallback for tools that only offer calendar presets. Confirm the paid date and the refund timestamp (on the refund record, with the order note as a cross-check) before reading any report.
A report ending November 1 includes the $110 net sale. Extend it through November 2 and the $55 refund also comes in.
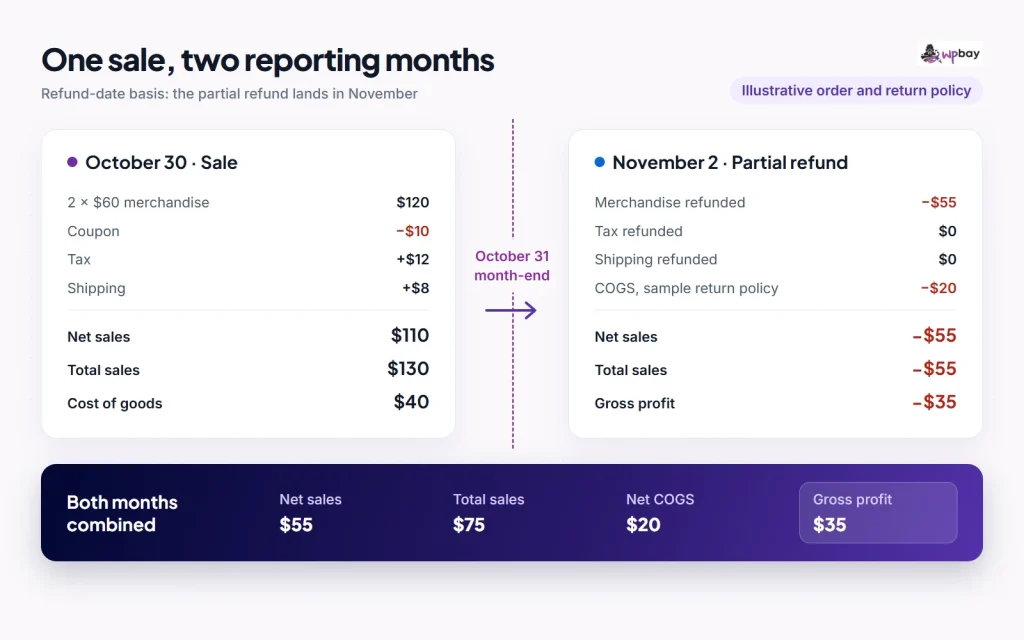
| Figure (refund-date basis) | October 2026 | November 2026 | Both months |
|---|---|---|---|
| Gross sales | $120 | $0 | $120 |
| Net sales | $110 | −$55 | $55 |
| Total sales | $129 | −$55 | $74 |
| COGS (fixture assumption) | $40 | −$20 | $20 |
| Gross profit (COGS only) | $70 | −$35 | $35 |
The table is a benchmark only for a refund-date summary using the same definitions, statuses and costs. A correctly configured view that ties refunds to the original order date should show October net sales of $55, COGS of $20 and gross profit of $35, with November at zero. Both are right; the totals across the two months still agree. A profit report that also deducts fees or shipping costs will differ by exactly those amounts, so turn them off or subtract them before comparing. Treat $35 as merchandise gross profit whatever the tool labels its Returns column.
Check weekly windows on a Wednesday
If weeks start on Monday and the rolling window excludes today, “last week” and “the last seven days” cover the same dates on a Monday, so a Monday send can’t tell you which logic a tool uses. On Wednesday, November 4, under those same assumptions, they differ. The previous Monday-to-Sunday week (October 26 to November 1) should show $110 net sales. The previous seven completed days (October 28 to November 3) contain both events and should show $55. The current week through Tuesday (November 2 to 3) should show −$55. A tool that includes today, uses a rolling timestamp, or starts weeks on Sunday will produce different windows, so record the timezone and whether the end date is inclusive. Check a real queued run as well as any manual preview, because the two can pick different windows. An order-date export for November 2 to 3 leaves out the October order, even though the November 2 refund appears in the sales summary.
Controls to run separately
- A pending order that your status settings should exclude.
- An order paid October 31 and completed November 1, to see which date each tool uses.
- A variation whose cost changes from $20 to $25 after a two-unit October sale. If the tool keeps historical costs, the unit cost stays $20, October COGS $40 and gross profit $70.
- A single-line, positive-revenue order for a product with no cost entered, measured on a COGS-only margin. A tool that treats a blank cost as zero can show 100% gross margin on it. Pair it with a product whose cost is deliberately set to $0, and check whether the tool tells the two apart.
- A taxed full refund, a partial refund followed by a full refund, and a refund with Restock unticked, to see where refunded tax and shipping land and whether COGS reverses for stock that never returns.
- An order with two different line items, to see whether an item export repeats order-level amounts on every row.
How to reconcile an order CSV with a refund CSV
For an import, check whether both files carry the order ID and whether each itemized refund identifies its original line. Metorik, for example, has separate Orders and Refunds resources. The orders file uses the sale window and the refunds file uses the refund window, so a November Orders export filtered by order date has no row for the October order while a November Refunds export has the refund. The column names and IDs below are illustrative, using order 1002 with two different variations, a $5 coupon share and $5.50 tax per line, $8 shipping, one itemized refund and one $5 goodwill refund with no line attached:
order_items.csv
order_id,line_id,sku,qty,line_subtotal,line_discount,line_tax,currency
1002,11,TEE-BLK-M,1,60.00,5.00,5.50,USD
1002,12,TEE-WHT-M,1,60.00,5.00,5.50,USD

orders.csv
order_id,shipping,shipping_tax,order_total,currency
1002,8.00,0.00,129.00,USD

refunds.csv
refund_id,refund_line_id,order_id,line_id,refund_date,qty,amount,tax,shipping,currency
1010,21,1002,12,2026-11-02,-1,-55.00,0.00,0.00,USD
1015,,1002,,2026-11-03,,-5.00,0.00,0.00,USD
Use refund ID plus refund-line ID, where the tool provides one, to identify each refund record. Then sum itemized refunds by order ID and original line ID before joining them to the item rows; joining one sale line straight to several refund rows repeats the sale once per refund. Refund 1015 has no line ID, so it goes to an order-level reconciliation queue rather than being forced onto a line. Alternatively, keep a single signed ledger with sales and refunds as separate rows and skip the join.
After the join, run check totals per currency. Line merchandise is $110 sold minus $55 refunded on line 12, so $55. Order-level adjustments add −$5, giving $50 net merchandise. Tax is $11 charged and $0 refunded. Shipping is $8, taken once per order_id from the orders file; a tool that repeats it on both item rows gives $16 for an order that charged $8. Together that’s $129 − $55 − $5 = $69, which should equal the order total less all refunds in the source order. Before buying, check that your plan exports order ID, line ID, variation SKU, quantity, line discount, refunded quantity and value, tax, shipping and currency, and whether refunds arrive as negative rows in the same file, as a second file, or not at all.
This sample stays narrow. If your store uses several currencies, custom order statuses, multiple tax rates, percentage coupons across mixed lines or different timezones per channel, run the totals per currency and per status first, then compare tax by rate. Any difference that survives those splits is a tool behavior to raise with the vendor.
Before you hand off a scheduled report
Put the timezone, reporting window and delivery deadline in the instructions finance uses when a file is missing. Add the recipient, whether a file or link should arrive, what happens on a week with no orders, how to request a resend and how duplicates are handled if a run repeats. For example: every Monday at 8 a.m. store time, the previous Monday-to-Sunday item CSV is attached to an email sent to the finance inbox, the operations lead owns it, and a missing email gets reported by 10 a.m. Leave out names and addresses if finance only reconciles SKU, quantity, tax and refunds, because every recurring email leaves another copy of that data in someone’s inbox.
Check the run log first. If the job generated a file, check whether the mail provider accepted the message.
- Open the tool’s own record of runs, such as the Daily PDF extension’s Logs tab or Metorik’s Recent Exports. Use WooCommerce > Status > Scheduled Actions only for jobs that run through it.
- Compare the next run time and the report’s dates in the store timezone.
- If the log records a send, check the mail provider’s delivery result. If the file arrived with stale totals, check the data timestamp in the source report.
- If Save & Send Now works but the scheduled run never fires, suspect WP-Cron. By default it only runs on a page request, so check whether your host triggers it from a system scheduler.
Before paying for a scheduler, send one report to the person who will use it and have them reconcile the file against the source order. If their import accepts it and the shipping, tax and refund totals match, you’ve found your tool; if not, the failing column tells you which row of the table to look at next.
Frequently asked questions
How do I download a WooCommerce sales report as a CSV?
Go to Analytics > Revenue, choose the date range, and click the download button above the table. A single-page result downloads immediately. A paginated result is built in the background and emailed as a link to your account address, and the link lasts one week, so re-request it if it expires.
Can a scheduled email include a CSV attachment, or only a digest?
It depends on the tool and setting. BerryPress attaches CSV presets, Metorik attaches recurring exports under 8 MB only when the attachment option is on, and Metorik digests and the Daily PDF extension send totals rather than order rows. If finance imports the file, insist on an attachment with a known row layout and test one before relying on it.
Will changing a variation’s cost change old orders?
In core WooCommerce, no: the cost saved on an existing order stays when you edit the catalog. In Metorik, a routine edit keeps recorded costs, an override in Cost Tools replaces them, and missing-only mode fills blanks, which can still change past profit totals. For other tools, run the $20-to-$25 control on staging.
Why did a refund change November sales when the order was paid in October?
Analytics counts a refund in the period it was issued, so October keeps the $110 net sale and November shows −$55. The same rule explains why a Monday sales digest disagrees with an Orders file filtered by order date: the digest shows the refund, the file has no row for the October order. If your accountant wants refunds tied to the original month, use a view that attributes them to the order date, such as Metorik’s Orders report, or pull a refund-date file alongside the orders file.
Why does my report differ from my processor payout?
Payouts mix charges and refunds from different days and net out fees and adjustments. Start from one payout’s transaction list, match each charge and refund to its order ID, and list fees separately. The payout example walks through one order.
Last reviewed: November 19, 2026. Prices, plan terms and declared compatibility change, so check each vendor’s page before buying.